
Microsoft Teams Meeting Rooms
Transforming Meeting Spaces: A Guide to Designing Microsoft Teams Rooms
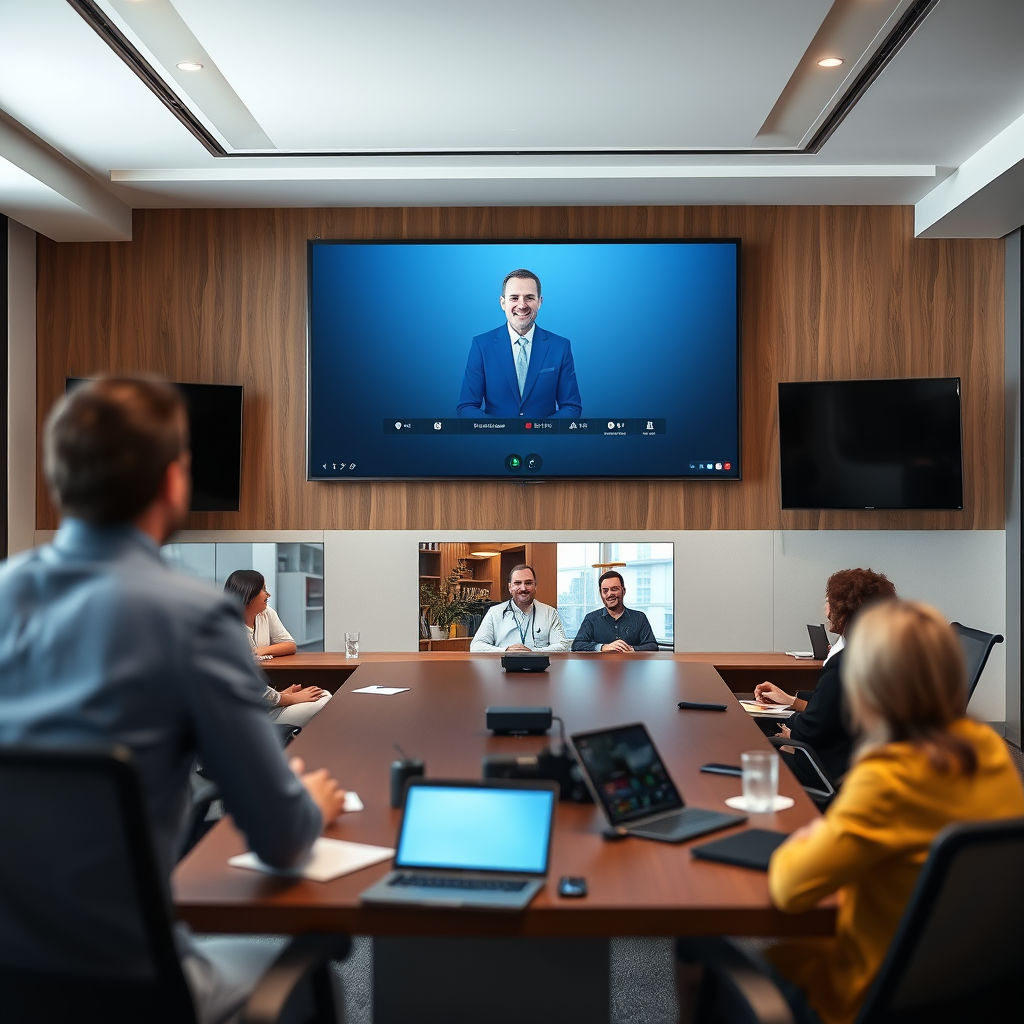
In today’s fast paced work environment, the need for effective collaboration tools is more crucial than ever. Microsoft Teams Rooms (MTR) offers a seamless solution that transforms any ordinary meeting space into a high-performance hub for teamwork and communication. Here's how you can design and set up these rooms to enhance productivity and foster better collaboration.
Understanding Microsoft Teams Rooms
At its core, Microsoft Teams Rooms is designed to integrate smoothly with Microsoft Teams, offering a robust suite of features for video conferencing, content sharing, and collaboration. The goal is to ensure a consistent and high quality experience for both in person and remote participants, making meetings more inclusive and effective.
Key Components of Microsoft Teams Rooms
To create an efficient Teams Room, you need to focus on these essential components:
- Compute and Control Devices: These include a dedicated compute unit like a mini PC and a touchscreen console. These devices power the Teams Room software, making it easy for users to manage meetings.
- Audio and Video Equipment: High quality cameras, microphones, and speakers are non-negotiable. Whether you're using a simple webcam or an advanced AV system, clear audio and video are key to making remote participants feel like they're in the room.
- Displays: One or more high definition displays are necessary for sharing content and video feeds. For enhanced collaboration, consider interactive whiteboards like the Microsoft Surface Hub, which allows real time drawing and annotation.
- Room Accessories: Think docking stations, wireless presentation systems, and touch less controls. These extras can significantly improve the user experience and adapt to various meeting styles.
Steps to Designing Microsoft Teams Rooms
- Assess the Space: Start by evaluating the room's size, layout, acoustics, lighting, and seating arrangements. Identify any challenges, such as poor acoustics or inadequate lighting, and plan to address them.
- Define Use Cases: Understand how the room will be used—whether it's a small huddle room, a medium sized conference room, or a large boardroom. Each type has specific requirements for audio, video, and control systems.
- Select Appropriate Hardware: Based on the room size and use case, choose the right hardware. For example:
Small Rooms: Consider an all-in-one device with a built-in camera, microphone, and speaker.
Medium Rooms: Opt for separate components like a PTZ camera, ceiling microphones, and wall mounted speakers.
Large Rooms: High end integrated AV systems with multiple microphones, speakers, and displays are ideal.
- Ensure Network Connectivity: A robust network connection is crucial. Ensure the room has both wired and wireless options, and configure Quality of Service (QoS) settings to prioritize video conferencing traffic.
- Install and Configure the System:
Mounting: Secure cameras, displays, and other equipment. Ensure the camera covers the room well, and displays are easy to view.
Cabling: Use high quality cables and manage them neatly to avoid clutter.
Software Setup: Install Teams Room software on the compute device and configure it with the necessary accounts.
Calibration: Optimize performance by calibrating audio and video equipment. Test microphone pickup, speaker output, and camera angles.
- Test and Optimize: Run thorough tests to ensure everything works as expected. Gather feedback from test meetings and make necessary adjustments.
- Provide Training and Support: Ensure users are comfortable with the new system by offering training sessions and user guides. Provide ongoing support and keep the system updated.
Best Practices for Microsoft Teams Rooms
Room Acoustics: Use sound absorbing panels to reduce echo and background noise.
Lighting: Ensure proper lighting to avoid harsh backlighting or shadows. Adjustable lighting can accommodate different meeting types.
User Experience: Simplify the interface and provide clear instructions for managing meetings. Use presets for common settings to save time.
Security: Protect the system with encryption and restrict access to authorized users.
Conclusion
Designing a Microsoft Teams Room is about more than just installing hardware—it's about creating an environment where collaboration can thrive. By understanding the key components, assessing the space, selecting the right hardware, and following best practices, you can turn any meeting room into a powerful hub for teamwork. Embrace the future of work with Microsoft Teams Rooms and elevate your organization’s collaboration capabilities.
As an experienced Audio Visual Project Manager with a dedicated career spanning 17 years in the dynamic world of AV technology. Throughout my journey, I've cultivated a deep passion for orchestrating seamless audiovisual experiences that captivate and inspire audiences.
With nearly two decades of hands-on experience, I've honed my skills in every aspect of AV project management, from initial concept development to final execution. My expertise encompasses a wide range of projects, including corporate events, live concerts, theatrical productions, and immersive installations.
What sets me apart is my commitment to excellence and innovation. Over the years, I've remained at the forefront of industry trends, continually exploring new technologies and techniques to push the boundaries of what's possible in the AV realm. This forward-thinking approach has allowed me to deliver cutting-edge solutions that exceed client expectations and leave a lasting impression.
Collaboration is at the heart of my work ethic. I thrive in environments where diverse teams come together to turn ideas into reality. By fostering open communication and leveraging each team member's unique strengths, I ensure that every project is executed with precision and creativity.
In addition to my technical expertise, I bring a strategic mindset to project management. I understand the importance of meticulous planning, budget management, and timeline adherence. By meticulously overseeing every aspect of the project lifecycle, I ensure smooth execution and successful outcomes, time and time again.
As an Audio Visual Project Manager, I don't just deliver projects; I craft unforgettable experiences that leave a lasting impact. My goal is simple: to create moments that inspire, entertain, and connect people on a profound level. With 17 years of experience under my belt, I'm excited to continue pushing the boundaries of audiovisual excellence and shaping the future of the industry.
-
Xchange Advocates are recognized AV/IT industry thought leaders and influencers. We invite you to connect with them and follow their activity across the community as they offer valuable insights and expertise while advocating for and building awareness of the AV industry.
Please sign in or register for FREE
If you are a registered user on AVIXA Xchange, please sign in
Thank you @Aneesh Krishnankutty, PMP, PRINCE2, CTS-I, CTS-D for this comprehensive guide on designing Microsoft Teams Rooms.
In today’s rapidly evolving work environment, the need for effective collaboration tools has never been more critical. Microsoft Teams Rooms offers a seamless solution, transforming any meeting space into a high-performance hub for communication. It enhances productivity, ensuring a consistent and high-quality experience for both in-person and remote participants.